EB Tresos Mcal 最小系统搭建
环境准备
根据文档 环境配置 搭建对应的运行环境,确保版本号一致,对应芯片型号的RTD和升级包均已正确安装。
创建项目
本项目利用S32 Design Studio 进行编译调试和代码编写,利用 EB tresos Studio 进行 Mcal 配置,并通过该软件的 Generate 功能将配置转化为 .c/.h 代码,包含入 S32 Design Studio代码中,进行编译。
S32 DS 部分
在 S32 Design Studio 中,点击 File -> New -> S32DS Application Project,选择 Processor -> Family -> S32K1xx -> S32K116 ,右侧选择 NXP GCC 6.3 for Arm 32-bit Bare-Matel,单击 Next。
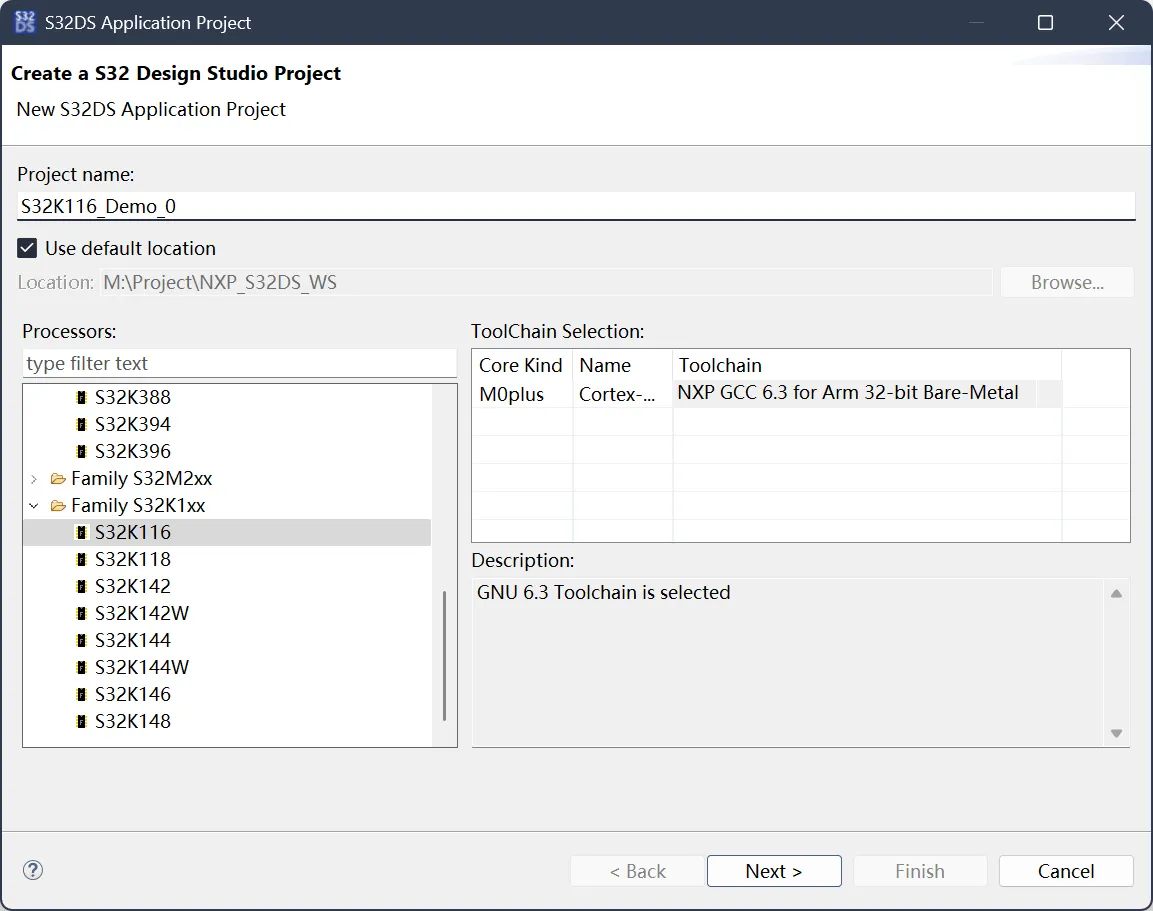
在如图所示位置选择 SDK(由于我们使用 EB Tresos 作为 Mcal 配置工具,所以SDKs 可以留空)。
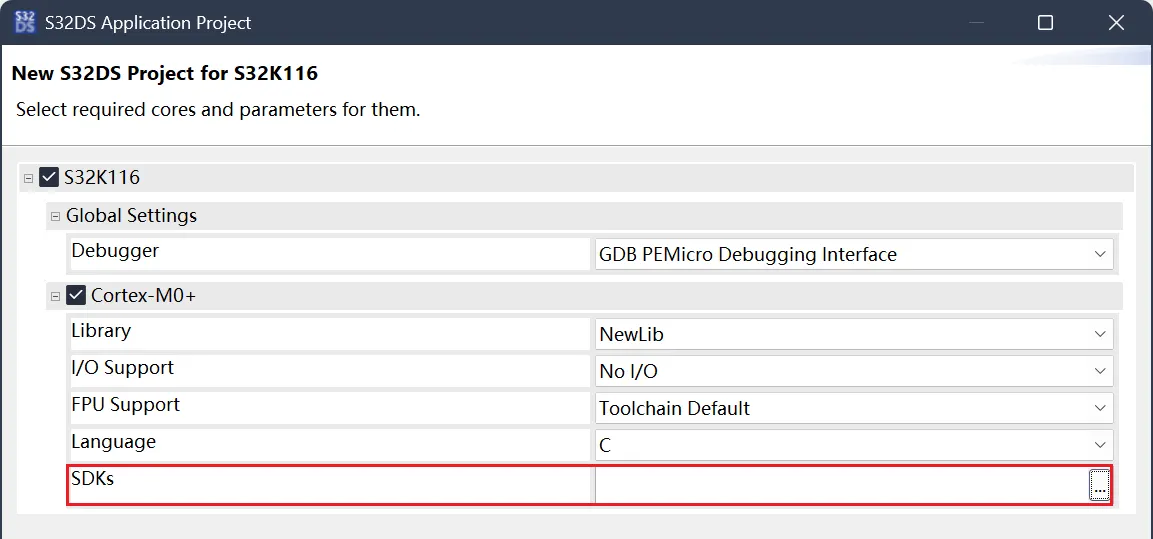

单击 Finish 后等待项目加载完成,点击 Dashboard 中的 Build,发现 Console 中显示正确显示生成 .elf 文件说明创建成功。
EB Tresos Studio 部分
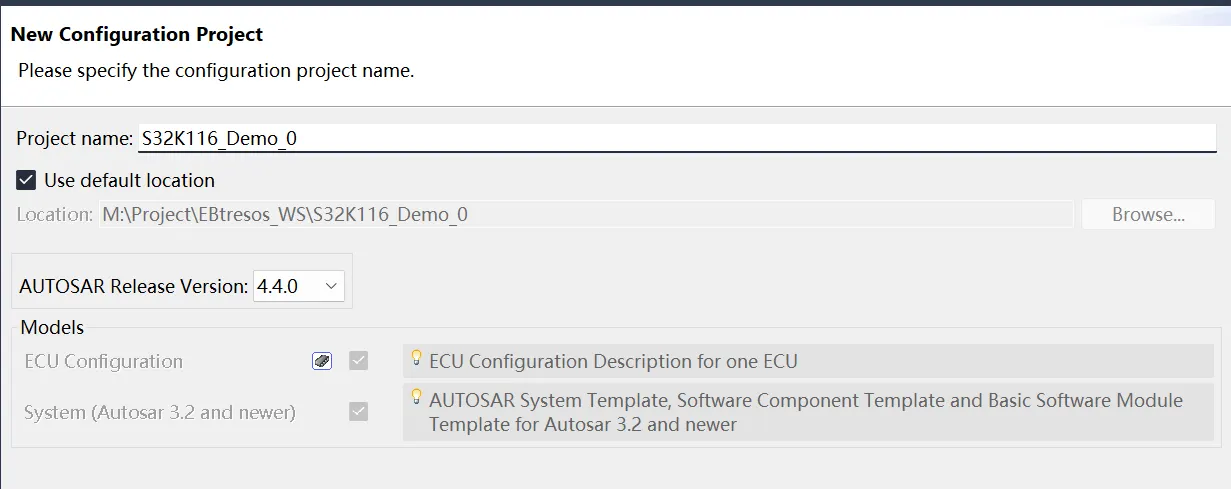
新建项目,同上
注意将 AUTOSAR Release Version 改为 4.4.0。
S32 DS 与 EB Tresos 联合
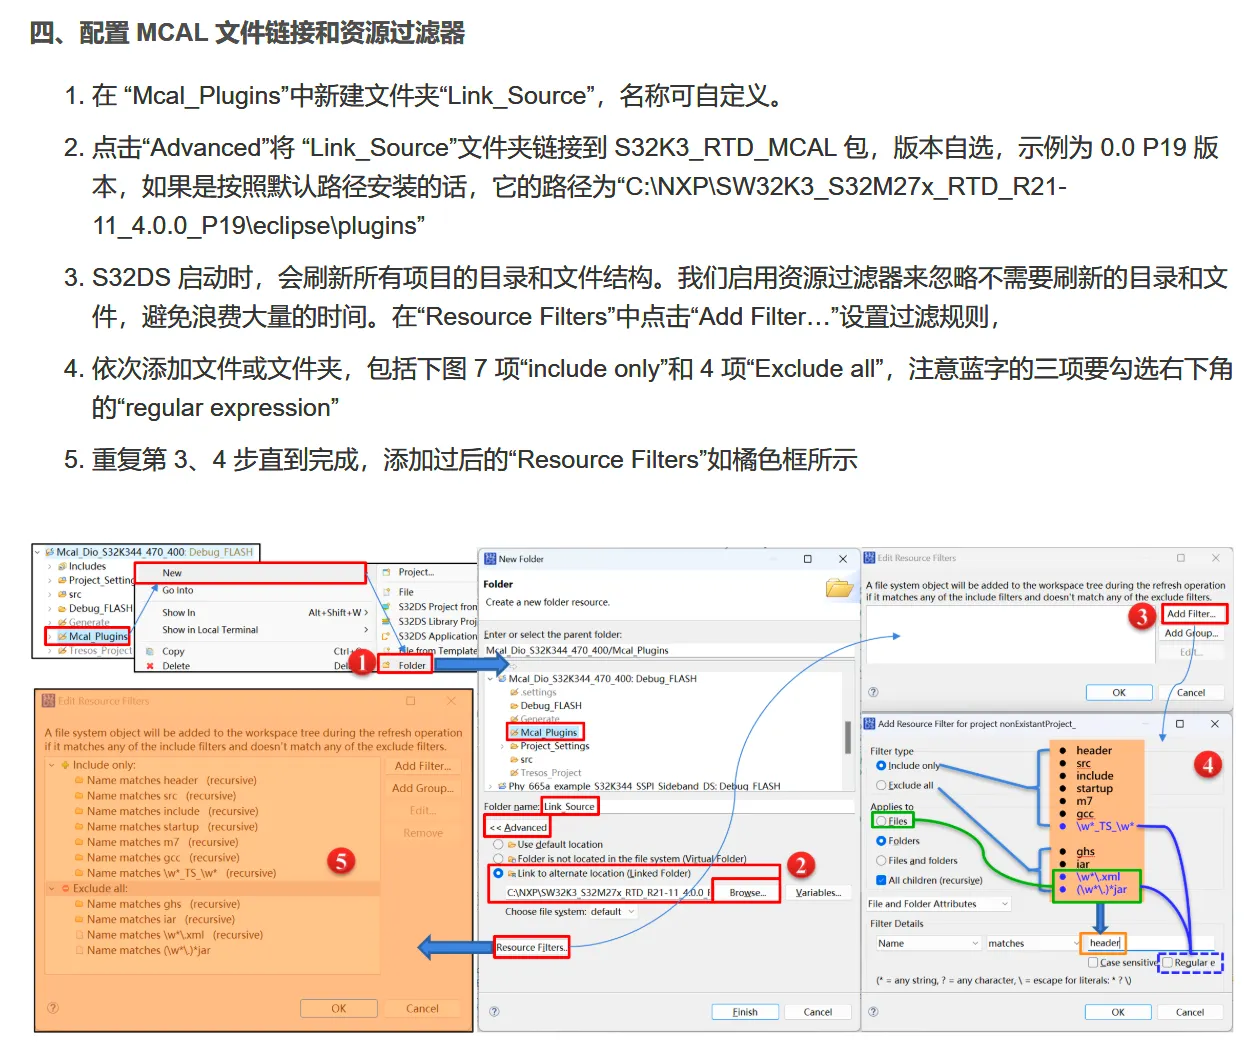
参考(两篇文章内容大致相同,只有 Mcal_Plugins/Link_Source 部分 CSDN 更为明确,在下文报错说明中亦有描述):
S32K344_MCAL_Integrate_with_S32DS https://blog.csdn.net/wpgddt/article/details/139745190
需要注意的是,在Properties->Settings->Standard S32DS C Compiler->includes 配置部分,只添加下文 EB Module 中使用的即可。
EB Tresos 模块配置
添加如下最小系统:
- Base 基本模块的配置,包括 OsIf 的配置等
- Mcu 对 MCU 的抽象控制,如时钟、电源模式、复位等
- Platform 提供与平台架构相关功能,中断等
- Port 配置 MCU 引脚复用
- Resource 资源管理
- (Dio) Digital IO,配置输出、输入信号
对每个模块的配置说明如下:
Base
Mcu
Mcu操作的部分主要是时钟部分。
- 在 General 中 将 Config Variant 改为 VariantPreCompile。
- 在 McuClockSettingConfig 中新建 McuClockSettingConfig_0,在左下角 Outline 中展开。
- 展开后进入 McuPeripheralClockConfig,配置外设时钟。点击标题栏右侧的按钮 Add required elements,添加所有模块的时钟。(这步操作需要在设置 Resource 模块之后,因为其对所需外设的判断依赖于 Resource 中设置的芯片型号)
- 在 McuClockReferencePoint 中新建一个参考点。
Platform
- 关闭 General 中的 Platform Development Error Detection,否则会报错:找不到 Det.h 文件。
Port
- 在 PortContainer 中新建 PortCounter_0,并在 Outline中展开。
- 在 PortPin 中新建 PortPin_0,并根据需要改变参数值(如根据 Id 和 Pcr 指定 IO 口),其余 PortPin 以此类推。
- 在 Outline 中展开该 PortPin,进行相应设置。
- 回到 Port 顶层目录,在 UnTouchedPortPin 中设置调试端口。(如果在新建项目选择了相应模板,这一步可能是被设置好的)
Resource
在 General 中设置 ResourceSubderivative 为需要的芯片型号。
Dio(以点亮 LED 为例)
- 在 DioPort 中新建一个 DioPort_0,根据需要设置 Dio Port Id 并在 Outline 窗口中展开。
- 在 General 中将 Dio Port Id 更改为 新建的 PortNumber。
- 添加 DioChannel,命名为 LED_Toggle,根据需要设置 Channel Id。
进行以上设置后,在 Project Explorer 中右键项目,选择 Generate Project。
S32 DS 代码编写
先运行 Build,看是否报错,如果有报错,检查上述步骤。
下面给出 RTD 中对于 LED_Toggle 的示例代码。
/*
*   (c) Copyright 2021 NXP
*
*   NXP Confidential. This software is owned or controlled by NXP and may only be used strictly
*   in accordance with the applicable license terms.  By expressly accepting
*   such terms or by downloading, installing, activating and/or otherwise using
*   the software, you are agreeing that you have read, and that you agree to
*   comply with and are bound by, such license terms.  If you do not agree to
*   be bound by the applicable license terms, then you may not retain,
*   install, activate or otherwise use the software.
*
*   This file contains sample code only. It is not part of the production code deliverables.
*/

#ifdef __cplusplus
extern "C" {
#endif

/*==================================================================================================
*                                        INCLUDE FILES
* 1) system and project includes
* 2) needed interfaces from external units
* 3) internal and external interfaces from this unit
==================================================================================================*/
#include "Mcu.h"
#include "Port.h"
#include "Dio.h"

/*==================================================================================================
*                          LOCAL TYPEDEFS (STRUCTURES, UNIONS, ENUMS)
==================================================================================================*/

/*==================================================================================================
*                                       LOCAL MACROS
==================================================================================================*/

/*==================================================================================================
*                                      LOCAL CONSTANTS
==================================================================================================*/

/*==================================================================================================
*                                      LOCAL VARIABLES
==================================================================================================*/

/*==================================================================================================
*                                      GLOBAL CONSTANTS
==================================================================================================*/

/*==================================================================================================
*                                      GLOBAL VARIABLES
==================================================================================================*/

/*==================================================================================================
*                                   LOCAL FUNCTION PROTOTYPES
==================================================================================================*/

/*==================================================================================================
*                                       LOCAL FUNCTIONS
==================================================================================================*/

/*==================================================================================================
*                                       GLOBAL FUNCTIONS
==================================================================================================*/

void TestDelay(uint32 delay);
void TestDelay(uint32 delay)
{
   static volatile uint32 DelayTimer = 0;
   while(DelayTimer<delay)
   {
       DelayTimer++;
   }
   DelayTimer=0;
}

/**
* @brief        Main function of the example
* @details      Initializez the used drivers and uses the Icu
*               and Dio drivers to toggle a LED on a push button
*/
int main(void)
{
    uint8 count = 0U;

    /* Initialize the Mcu driver */
#if (MCU_PRECOMPILE_SUPPORT == STD_ON)
    Mcu_Init(NULL_PTR);
#elif (MCU_PRECOMPILE_SUPPORT == STD_OFF)
    Mcu_Init(&Mcu_Config_VS_0);
#endif /* (MCU_PRECOMPILE_SUPPORT == STD_ON) */

    Mcu_InitClock(McuClockSettingConfig_0);
#if (MCU_NO_PLL == STD_OFF)
    while ( MCU_PLL_LOCKED != Mcu_GetPllStatus() )
    {
        /* Busy wait until the System PLL is locked */
    }

    Mcu_DistributePllClock();
#endif
    Mcu_SetMode(McuModeSettingConf_0);

    /* Initialize all pins using the Port driver */
    Port_Init(NULL_PTR);

    while (count++ < 10)
    {
        /* Get input level of channels */
        Dio_WriteChannel(DioConf_DioChannel_LED_Toggle, STD_HIGH);
        TestDelay(2000000);

        Dio_WriteChannel(DioConf_DioChannel_LED_Toggle, STD_LOW);
        TestDelay(2000000);

    }

//    Exit_Example(TRUE);

    return (0U);
}

#ifdef __cplusplus
}
#endif

/** @} */
可以注意的是,这段代码的核心在于以下几行:
Mcu_Init(NULL_PTR);
Mcu_InitClock(McuClockSettingConfig_0);
Mcu_SetMode(McuModeSettingConf_0);

Port_Init(NULL_PTR);

Dio_WriteChannel(DioConf_DioChannel_LED_Toggle, STD_HIGH);
现在进行解释:
前三行是 Mcu 初始化部分,其中 McuClockSettingConfig_0 和 McuModeSettingConf_0 与 在 EB tresos 中设置的名称保持一致(可以在 Mcu_Cfg.h 中查看):

第五行是对 Port进行初始化。
第7行是对 Dio 进行操作。值得注意的是,WriteChannel 的 API 需要在 Dio 设置中勾选开放该 API (默认开放)。
特别地,宏定义 DioConf_DioChannel_LED_Toggle 也是在 EB tresos 中设置的。可以在文件 Dio_Cfg.h 中通过搜索 Channel 名称进行查看:
/**
* @brief          Symbolic name for the channel LED_Toggle.
*
*/
#define  DioConf_DioChannel_LED_Toggle ((uint16)0x0020U)
点击 build,若显示 0 errors,即表示编译成功。
杂项
对于 Port、Dio 等 Module 的具体配置,可以参考 <your_rtd_address>/eclipse/plugins/<module_name>/doc/RTD_xxx_UM.pdf 中相应诠释。
或者参考:
报错说明
- 遇到报错(节选):
C:/NXP/SW32K1_RTD_4.4_1.0.0_HF01/eclipse/plugins/Port_TS_T40D2M10I0R0/generate_PB/src/Port_Ci_Port_Ip_PBcfg.c:74:35: error: token "[" is not valid in preprocessor expressions
   74 |#define PORT_CI_PORT_IP_VENDOR_ID_[!IF "var:defined('postBuildVariant')"!][!"$postBuildVariant"!]_[!ENDIF!]PBCFG_C                       43
      |                                   ^
C:/NXP/SW32K1_RTD_4.4_1.0.0_HF01/eclipse/plugins/Port_TS_T40D2M10I0R0/generate_PB/src/Port_Ci_Port_Ip_PBcfg.c:86:6: note: in expansion of macro 'PORT_CI_PORT_IP_VENDOR_ID_'
   86 |#if (PORT_CI_PORT_IP_VENDOR_ID_[!IF "var:defined('postBuildVariant')"!][!"$postBuildVariant"!]_[!ENDIF!]PBCFG_C != PORT_CI_PORT_IP_VENDOR_ID_H)
      |      ^~~~~~~~~~~~~~~~~~~~~~~~~~
C:/NXP/SW32K1_RTD_4.4_1.0.0_HF01/eclipse/plugins/Port_TS_T40D2M10I0R0/generate_PB/src/Port_PBcfg.c:45:1: error: expected identifier or '(' before '[' token
   45 | [!NOCODE!][!//
      | ^
make: *** [Mcal_Plugins/Link_Source/Port_TS_T40D2M10I0R0/generate_PC/src/subdir.mk:20: Mcal_Plugins/Link_Source/Port_TS_T40D2M10I0R0/generate_PC/src/Port_Cfg.o] Error 1
C:/NXP/SW32K1_RTD_4.4_1.0.0_HF01/eclipse/plugins/Port_TS_T40D2M10I0R0/generate_PB/src/Port_Ci_Port_Ip_PBcfg.c:75:50: error: token "[" is not valid in preprocessor expressions
   75 |#define PORT_CI_PORT_IP_AR_RELEASE_MAJOR_VERSION_[!IF "var:defined('postBuildVariant')"!][!"$postBuildVariant"!]_[!ENDIF!]PBCFG_C        4
      |                                                  ^
C:/NXP/SW32K1_RTD_4.4_1.0.0_HF01/eclipse/plugins/Port_TS_T40D2M10I0R0/generate_PB/src/Port_Ci_Port_Ip_PBcfg.c:90:7: note: in expansion of macro 'PORT_CI_PORT_IP_AR_RELEASE_MAJOR_VERSION_'
   90 |#if ((PORT_CI_PORT_IP_AR_RELEASE_MAJOR_VERSION_[!IF "var:defined('postBuildVariant')"!][!"$postBuildVariant"!]_[!ENDIF!]PBCFG_C    != PORT_CI_PORT_IP_AR_RELEASE_MAJOR_VERSION_H)  || \\
      |       ^~~~~~~~~~~~~~~~~~~~~~~~~~~~~~~~~~~~~~~~~
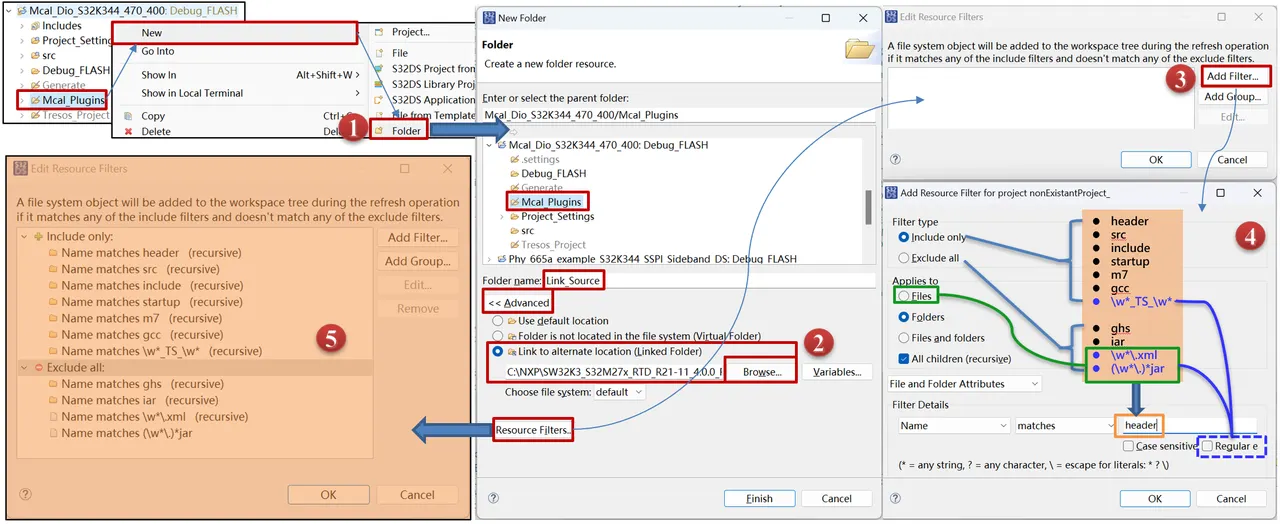
检查 S32DS 与 EB tresos 联合部分的 Mcal_Plugins/Link_Source 有没有配置好 Filter,即:
- Debug卡死,遇到报错:
Function "main" not defined.
检查是否将 Startup文件链接到项目:
<your_rtd_address>/eclipse/plugins/Platform_TS_[version]/startup/src/m0p